Surprise Inside Graduation Cake
Highlighted under: Party Desserts
When I first crafted this Surprise Inside Graduation Cake, I wanted to make something truly memorable for my friends’ graduation party. The thrill of cutting into a beautifully decorated cake only to reveal a vibrant, colorful surprise inside is a delight that everyone will cherish. Each layer is not just visually captivating but also brimming with flavors that complement each other perfectly. With dedication and a bit of creativity, I’ve made this cake an unforgettable centerpiece for any celebration!
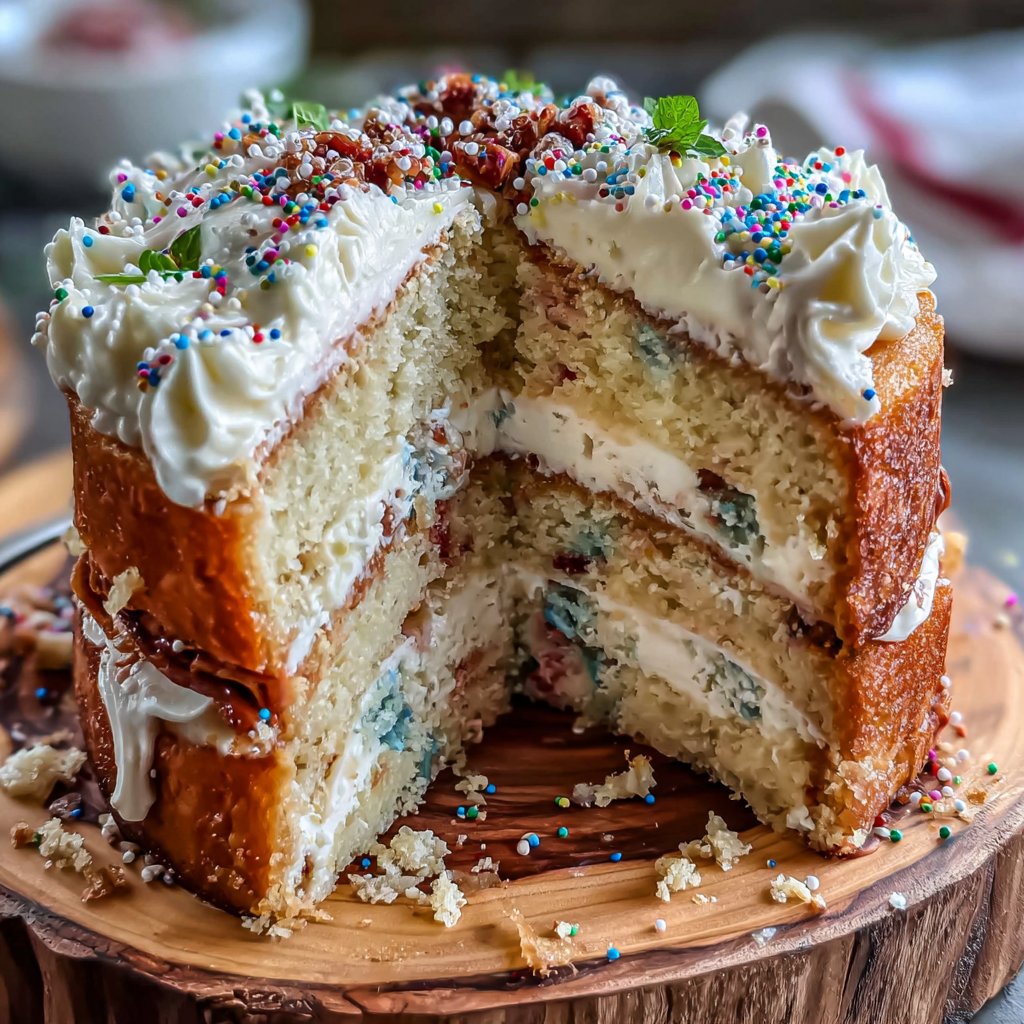
Creating this cake for a graduation celebration was an exciting journey. I wanted to blend flavors and colors that would not only tantalize the taste buds but also spark joy in the hearts of the graduates. After experimenting with vanilla and chocolate cake layers, I settled on a vibrant colored sponge as the surprise element, ensuring it matched the festive atmosphere. This cake was an instant hit with everyone!
One of the best parts of this recipe is the effective layering technique. To achieve those vibrant colors, I used gel food coloring, which worked wonders. It’s essential to let each part cool completely before assembling, as this ensures a clean-cut when you reveal the surprise inside. A simple trick, but so effective for presentations!
Why You Will Love This Recipe
- A stunning surprise that will wow your guests
- Rich flavors that appeal to all ages
- Perfectly combines a fun design with delicious taste
The Importance of Layering Colors
When creating your Surprise Inside Graduation Cake, the colors are as important as the flavors. Layering distinct colored batters not only adds to the visual appeal but also allows for a more exciting flavor experience. Each color can be a different flavor, such as vanilla, chocolate, or lemon, making the cake a delightful adventure with every slice. Remember, choosing complementary flavors will enhance the cake's overall harmony. For instance, pairing a fruity layer with a rich chocolate can surprise your taste buds.
For those who may be new to using gel food coloring, a little goes a long way. Start with a toothpick to add color to your batter, gradually increasing until you reach the desired shade. This method prevents overwhelming your cake with coloring, ensuring that the final appearance remains vibrant without affecting the texture. Once tinted, you might want to swirl the colors for a marbled effect, which not only adds beauty but allows for a lovely mingling of flavors.
Frosting Tips for a Perfect Finish
The frosting plays a crucial role in both flavor and presentation. When preparing the buttercream, ensure your butter is at room temperature, which allows for better incorporation of the powdered sugar, resulting in a smoother consistency. If you find your frosting too thick, gradually add whole milk until you achieve a spreadable texture. Conversely, if it’s too thin, a tablespoon of powdered sugar can help thicken it effectively without altering the flavor.
As you frost the cake, consider using a spatula to create texture or patterns on the surface for added visual interest. If you prefer a smoother finish, a bench scraper can help you achieve that polished look. Don’t forget to chill the frosted cake for at least 30 minutes before serving; this will help set the frosting and make cutting the cake easier, ensuring each slice displays that delightful surprise inside.
Ingredients
Ingredients
Gather everything you need to create this stunning cake!
For the Cake
- 3 cups all-purpose flour
- 2 1/2 cups granulated sugar
- 1 cup unsalted butter, softened
- 1 cup whole milk
- 5 large eggs
- 1 tablespoon vanilla extract
- 2 teaspoons baking powder
- 1 teaspoon salt
- Gel food coloring (various colors)
For the Frosting
- 1 cup unsalted butter, softened
- 4 cups powdered sugar
- 1/4 cup whole milk
- 1 tablespoon vanilla extract
- Food coloring (optional)
For Decoration
- Graduation-themed cake toppers
- Sprinkles
Make sure to have all your ingredients measured and ready before starting for the best results!
Instructions
Instructions
Follow these steps to create your Surprise Inside Graduation Cake:
Prepare the Cake Batter
In a large mixing bowl, cream together the softened butter and sugar until light and fluffy. Add the eggs one at a time, mixing well after each addition. Stir in the milk and vanilla extract. In another bowl, combine the flour, baking powder, and salt. Gradually add the dry ingredients to the wet mixture and mix until just combined.
Color the Batter
Divide the batter into separate bowls based on how many colors you want to use for the surprise. Use gel food coloring to tint each portion of batter to your desired brightness. Be creative with your color combinations!
Bake the Cakes
Preheat the oven to 350°F (175°C). Grease and flour your cake pans. Pour the colored batter into the pans and bake for 25-30 minutes, or until a toothpick inserted in the center comes out clean. Allow to cool in the pans for 10 minutes before transferring to wire racks to cool completely.
Assemble the Cake
Cut a circle in the center of the lower layer of one of your cooled cakes to create a hole for the surprise. Place this layer on a serving plate. Fill the hole with the second layer's cake, ensuring it's centered, and repeat until all layers are stacked with the surprise in the middle.
Make the Frosting
In a mixing bowl, beat the softened butter until creamy. Gradually add powdered sugar, mixing until smooth. Mix in the milk and vanilla extract. If desired, use food coloring to achieve a desired hue for the frosting.
Frost and Decorate
Coat the entire cake with a layer of frosting, smoothing it out as you go. Decorate with graduation-themed cake toppers and sprinkles to give it a festive touch. Chill for about 30 minutes before serving.
Enjoy your beautifully crafted Surprise Inside Graduation Cake with friends and family!
Pro Tips
- To ensure a clean slice when serving, use a hot knife to cut through the frosting and cake layers. This technique helps maintain the cake's beautiful design.
Customization for Special Diets
For those following a gluten-free diet, substituting all-purpose flour with a gluten-free blend can yield excellent results in this cake. Look for a blend that contains starches and gums to provide structure, and make sure to measure accurately as gluten-free flours can behave differently in recipes. You might also consider a dairy-free alternative by using a plant-based butter and almond milk, ensuring that everyone can enjoy this festive cake at your celebration.
If you or your guests are looking to reduce sugar, consider using a natural sweetener substitute like erythritol or stevia while being mindful of their specific conversion ratios. Each substitute behaves differently in baking, so it is wise to conduct a small test batch to find the right balance. This way, you won't lose out on the rich, flavorful experience that makes this cake special.
Storage and Make-Ahead Strategies
If you plan to make this cake ahead of time, consider baking the layers and freezing them. Properly wrap each cooled layer in plastic wrap and aluminum foil to prevent freezer burn. The layers can typically be stored this way for up to three months. When ready to use, thaw them in the refrigerator overnight before frosting. This method not only saves time but can enhance the flavors as they develop during storage.
Leftover slices can be stored in an airtight container at room temperature for up to three days, or in the refrigerator for a week. For longer storage, you can freeze individual slices wrapped tightly, making it easy to enjoy a piece whenever the craving strikes. Just remember to allow the frozen slices to thaw at room temperature for about 30 minutes before enjoying, as this helps restore the cake's optimal texture.
Questions About Recipes
→ Can I make this cake in advance?
Yes, you can bake the cake layers a day early. Just wrap them tightly and store them in the refrigerator until you're ready to assemble.
→ What can I use instead of gel food coloring?
You can use liquid food coloring, but be aware that it may alter the cake's moisture and texture slightly.
→ How can I store leftover cake?
Wrap the cake tightly in plastic wrap and keep it in the refrigerator for up to four days. It can also be frozen for longer storage.
→ What flavor variations can I try?
Feel free to experiment with different flavors of cake, such as chocolate, red velvet, or lemon. Just remember to keep the colors vibrant for the surprise effect!
Surprise Inside Graduation Cake
Created by: The Chefvincentfoods Team
Recipe Type: Party Desserts
Skill Level: Intermediate
Final Quantity: 10 servings
What You'll Need
For the Cake
- 3 cups all-purpose flour
- 2 1/2 cups granulated sugar
- 1 cup unsalted butter, softened
- 1 cup whole milk
- 5 large eggs
- 1 tablespoon vanilla extract
- 2 teaspoons baking powder
- 1 teaspoon salt
- Gel food coloring (various colors)
For the Frosting
- 1 cup unsalted butter, softened
- 4 cups powdered sugar
- 1/4 cup whole milk
- 1 tablespoon vanilla extract
- Food coloring (optional)
For Decoration
- Graduation-themed cake toppers
- Sprinkles
How-To Steps
In a large mixing bowl, cream together the softened butter and sugar until light and fluffy. Add the eggs one at a time, mixing well after each addition. Stir in the milk and vanilla extract. In another bowl, combine the flour, baking powder, and salt. Gradually add the dry ingredients to the wet mixture and mix until just combined.
Divide the batter into separate bowls based on how many colors you want to use for the surprise. Use gel food coloring to tint each portion of batter to your desired brightness. Be creative with your color combinations!
Preheat the oven to 350°F (175°C). Grease and flour your cake pans. Pour the colored batter into the pans and bake for 25-30 minutes, or until a toothpick inserted in the center comes out clean. Allow to cool in the pans for 10 minutes before transferring to wire racks to cool completely.
Cut a circle in the center of the lower layer of one of your cooled cakes to create a hole for the surprise. Place this layer on a serving plate. Fill the hole with the second layer's cake, ensuring it's centered, and repeat until all layers are stacked with the surprise in the middle.
In a mixing bowl, beat the softened butter until creamy. Gradually add powdered sugar, mixing until smooth. Mix in the milk and vanilla extract. If desired, use food coloring to achieve a desired hue for the frosting.
Coat the entire cake with a layer of frosting, smoothing it out as you go. Decorate with graduation-themed cake toppers and sprinkles to give it a festive touch. Chill for about 30 minutes before serving.
Extra Tips
- To ensure a clean slice when serving, use a hot knife to cut through the frosting and cake layers. This technique helps maintain the cake's beautiful design.
Nutritional Breakdown (Per Serving)
- Calories: 420 kcal
- Total Fat: 20g
- Saturated Fat: 10g
- Cholesterol: 80mg
- Sodium: 150mg
- Total Carbohydrates: 63g
- Dietary Fiber: 1g
- Sugars: 40g
- Protein: 4g